Electric Oven Replacement: What You Need to Know
When dealing with electric oven replacement, the process of swapping out a faulty electric oven or its core components to restore safe, reliable cooking. Also known as oven swap, it usually involves removing the heating element, control board, or the whole unit and installing new parts. This task often requires a qualified oven repair technician to guarantee proper wiring and compliance with safety standards.
Key Parts Involved in an Electric Oven Replacement
The two most common culprits are the electric oven element, the metal coil that generates heat inside the cavity and the oven control board, the electronic brain that regulates temperature and timing. Electric oven replacement encompasses both of these components: if the element burns out, the oven won’t heat; if the control board fails, the oven may display wrong temps or not start at all. Understanding how each part works helps you decide whether a simple part swap or a full‑unit replacement makes sense.
Another related entity is appliance repair, the broader service that covers diagnostics, part ordering, and installation for kitchen machines. Appliance repair services often bundle the oven element and control board swap into a single visit, saving you time and avoiding the hassle of sourcing parts yourself. When you book a service, the technician will run a quick voltage check, confirm the fault, and then proceed with the appropriate replacement.
Why does an oven need replacement rather than repair? In many cases, the cost of a new element (<$80‑$150) or a control board (<$120‑$250) is less than labor for a full‑unit swap. However, older ovens—especially those over 12‑15 years—may have multiple failing parts, corroded wiring, or outdated safety features. In those scenarios, an electric oven replacement of the entire unit becomes more cost‑effective and can improve energy efficiency.
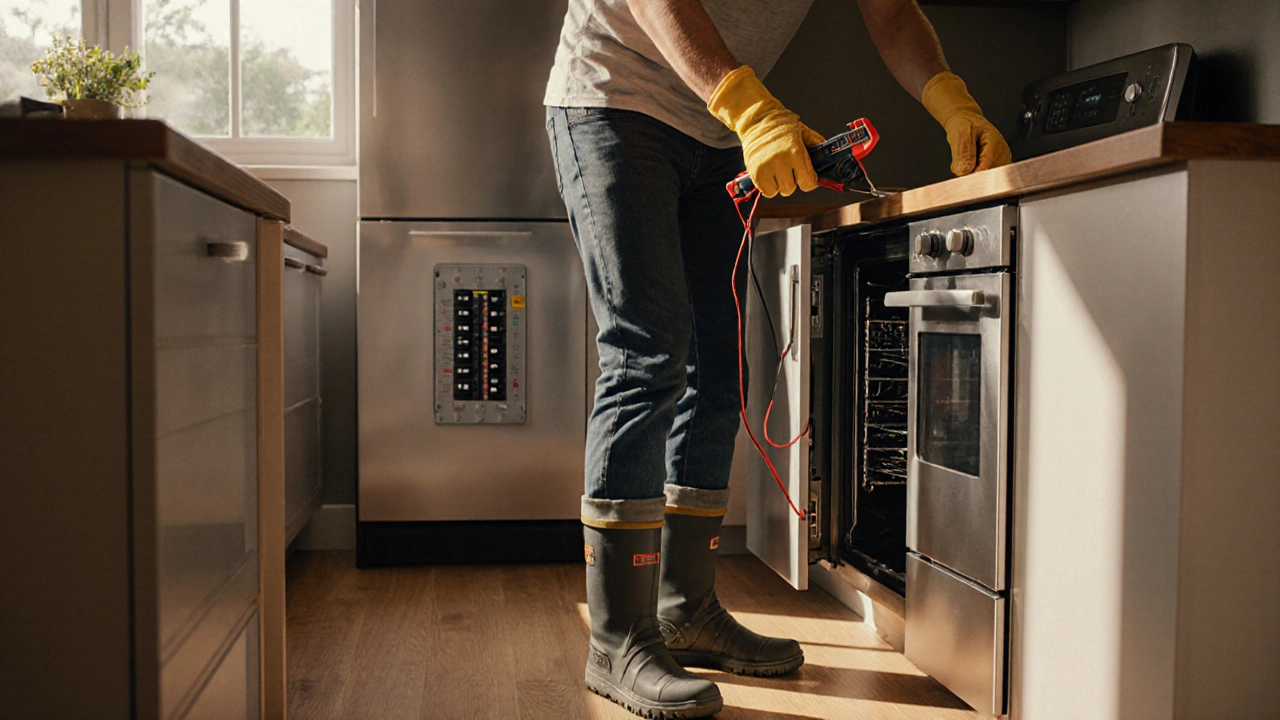
Cost isn’t the only factor. Safety regulations in the UK require that any electrical work on a cooker be carried out by a qualified electrician or a certified oven repair technician. This ensures the new parts are correctly grounded and that the appliance meets current standards. Skipping professional installation can void warranties and, more importantly, put your home at risk of electrical fires.
When you’re weighing options, ask yourself these questions: Is the oven still under warranty? Are the faulty parts readily available? Do you have the tools—like a multimeter, screwdrivers, and heat‑resistant gloves—to safely replace the element or board? If the answer is no, calling a professional is the smartest move.
For DIY‑savvy homeowners, there are reliable guides that walk you through the steps: unplug the oven, remove the back panel, disconnect the element or board, and install the new part. Always double‑check that the power is off at the breaker, and use a multimeter to confirm no live voltage before touching any wires. Even with careful work, a single mistake can cause a short circuit, so weigh the risk against the potential savings.
Beyond the element and control board, other components may need attention during a replacement. The temperature sensor, door hinges, and inner light are often overlooked but can affect performance. A failing temperature sensor, for example, can cause the oven to overheat or shut down prematurely. Including these parts in the replacement checklist ensures the oven runs smoothly after the main work is done.
In summary, an electric oven replacement is a multi‑step decision that balances cost, age of the appliance, safety, and the availability of skilled labor. Whether you opt for a single part swap or a full unit change, the goal is the same: a safe, reliable oven that heats evenly and lasts for years. Below you’ll find a collection of articles that dive deeper into each of these topics—from diagnosing a faulty element to choosing the right technician for the job. Explore the guides to get the practical insights you need before you book your service or roll up your sleeves.